RV Renovation, Part 1

She still needs a name!
If you’ve been following me in some capacity since 2018, you might remember our old camper we renovated (I use “renovate” loosely in this post). We sold it in 2020 when the demand was super high for campers, with everyone looking for COVID-friendly travel options. We wanted another camper eventually, but after several weeklong trips in our old one, we knew we wanted something different to do longer trips.
That led us to the one we recently purchased! Some of the main reasons we chose this one:
This time, we wanted an RV we could drive, with our vehicle towed behind.
We wanted to make sure there was a closeable workspace so we could work if needed and be gone for longer periods of time.
We wanted a dedicated sleep space for our daughter, where we didn’t have to transition the dining room table or a sofa into a bed every night.
Storage! More storage!
We plan to bring our pets (our dog, Farley, and our cat, Ted) with us for road trips, so we took their needs into account too.
And the more obvious wish list items such as low mileage, well-maintained, etc. Andy was also looking for some specifics on the mechanics of the vehicle, but I’m not qualified to provide insight on that ;)
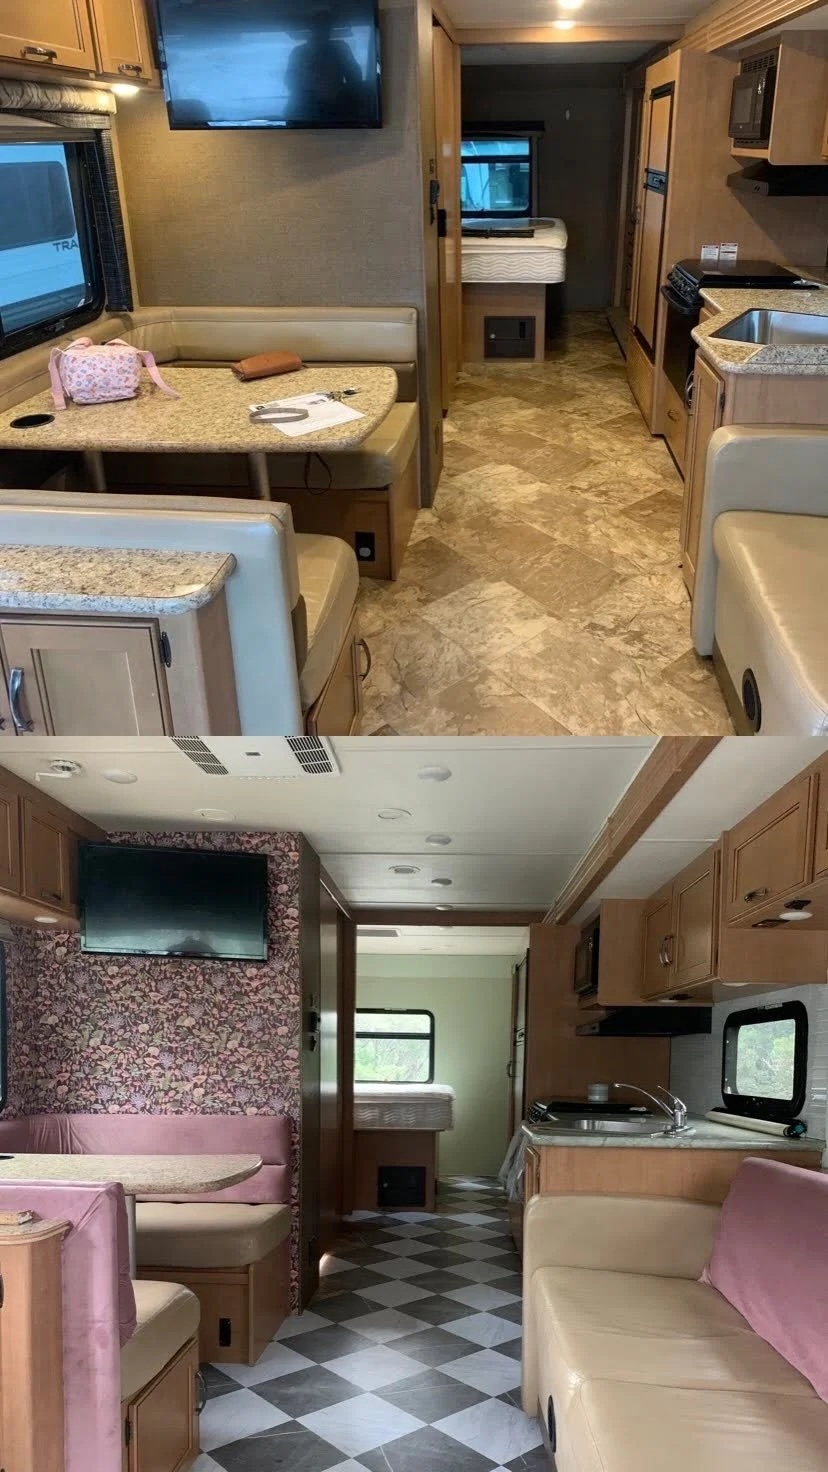
The Before


Step 1: Take Off the Window Valances
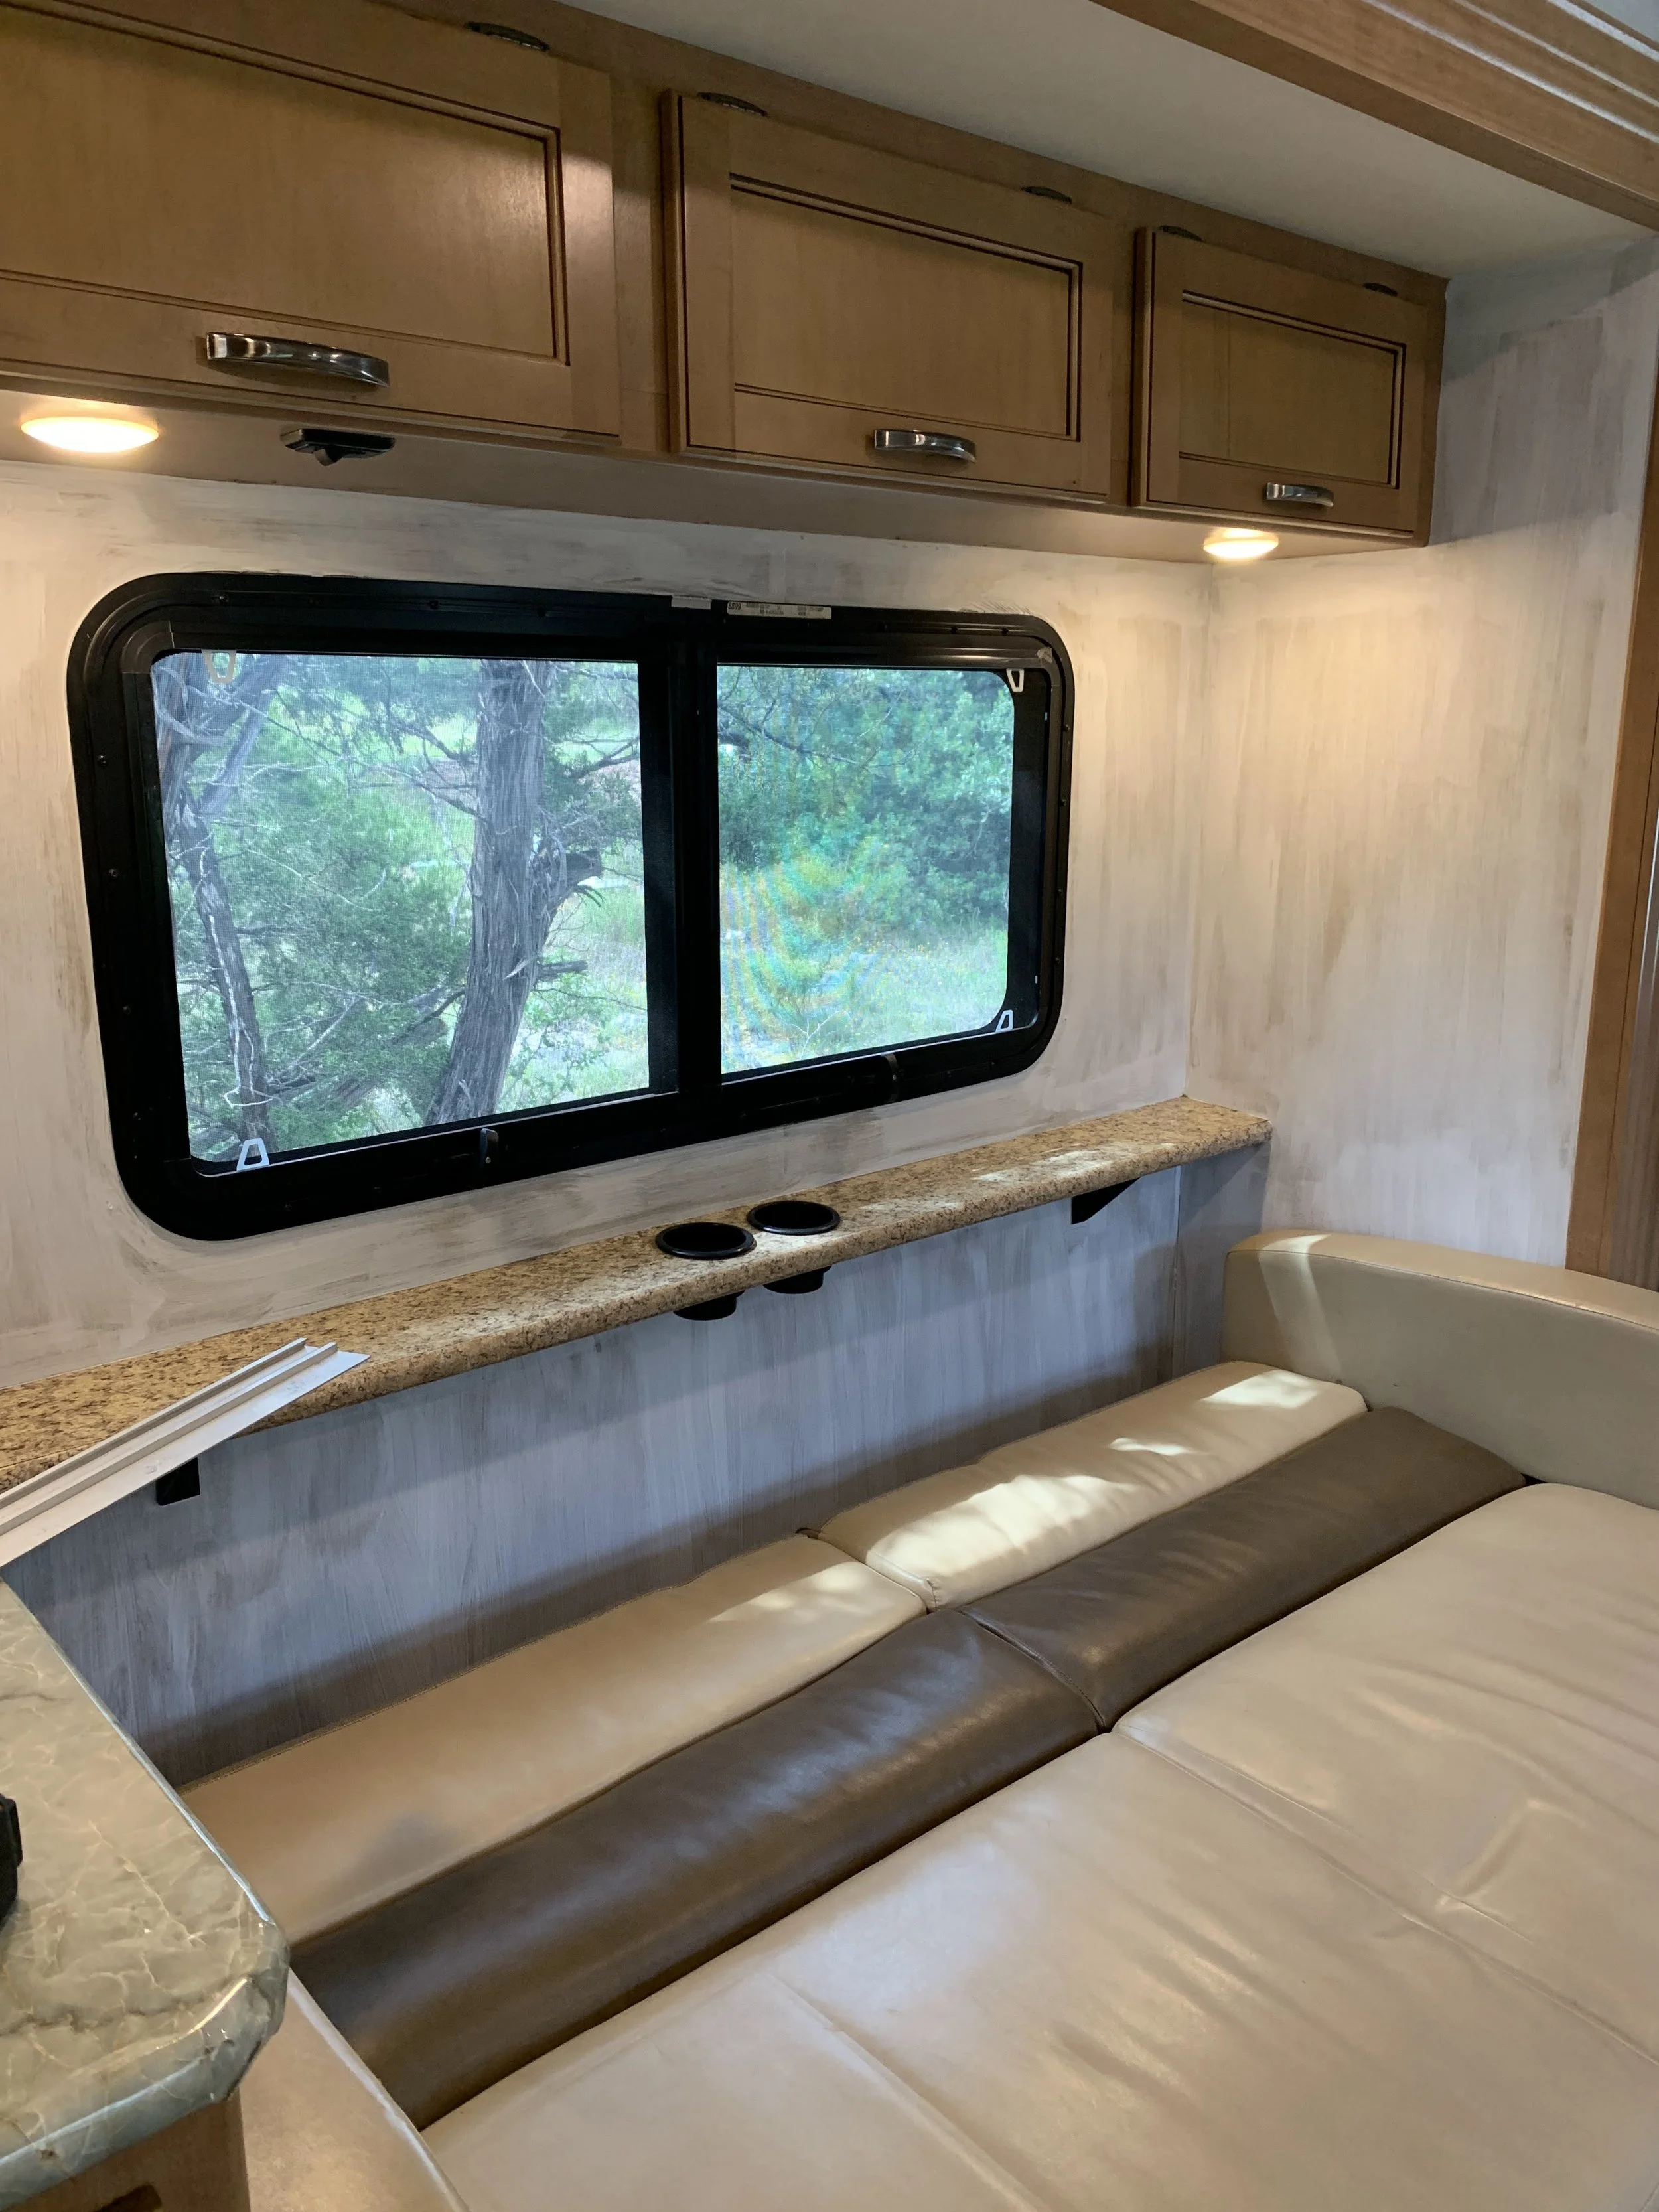
The first thing I did (and in my first camper too) was remove the window valances. Free upgrade! They’re so bulky and block what little natural light is available. RVs tend to be pretty dark so doing anything to bring in more natural light is a good idea in my book. In this RV, I kept the roller shades and added them back later after painting. Also, as you can see I started to peel off the “backsplash” to see how hard it was to get off. Spoiler: not easy.


Step 2: Paint
My main goal in updating our RV was to add in some color. Cabinets: Brown. Walls: Brown. Floors: Brown. Exterior: Brown. Upholstery: Brown. You get the idea. The only thing that wasn’t brown was the ceiling!
So, the first and easiest step to making the RV less brown was paint!
I used this primer before painting with my color of choice. It works like a charm! Before you paint RV walls, I recommend wiping them down with this cleaner. No sanding is needed - just clean, prime, and paint!
The white paint is whatever white I had lying in my garage. The green in the bedroom is Behr Balance Green.


Step 3: “Tile” and Wallpaper
We did peel-and-stick tile backsplashes and contact paper for the counters in our last RV. This time around, I wanted to do the same and also to use wallpaper in some areas too.
Let me start off by saying I HATE contact paper for covering counters. I remember hating it last time too, and yet, I thought maybe I’d be better at it this time? No. I was worse if anything. I intended to cover the bathroom counters as well, but after doing the kitchen, I decided I’d like to very much be done with that.
The variety of peel-and-stick tile options were much greater now than they were for our first RV back in 2018. I chose this tile for our bathroom backsplash, and this tile for our kitchen backsplash. They’re super easy to cut and require no special tools. You just need a tape measure and a blade to cut it.
Both sets of wallpaper came from Milton & King and are paste-to-the-wall. I would not recommend peel-and-stick wallpaper in an RV because of the drastic fluctuation in humidity and temperature when it’s not in use. So far, the wallpaper I used has held up well (UPDATE: some areas have not held up as well and have bubbled up from the wall). I used this paper in the bathroom and this paper in the dining area. This is the paste I used, which I painted onto the wall with a brush or roller before installing the wallpaper.


Step 4: Cushion Fabric and New Flooring
This was my first time reupholstering anything aside from a simple chair cushion. Is it perfect? Not even close. But it’s so much better than it was! I won’t offer advice on reupholstery here, because it probably would be bad advice. But I will share the fabric I used - here is the link.
The floors made such a major difference in the feel of the RV! I considered painting them which would have saved me some money, but opting for the peel-and-stick tile was SO easy and I think it will hold up much better. Here’s a link to the flooring I used.


Not Finished Quite Yet!
We are at a pretty good place to stop for now and take the RV out on some trips. Eventually, I do plan to paint some of the cabinets. I don’t want to paint them all, but I would like to break the brown up a bit more. I may swap out some cabinet hardware as well. And I’d like to do something about the remaining countertops. I may actually remove the contact paper I already installed in the kitchen and try something else - maybe paint? I get the feeling all the bubbles and folds in the counter will get on my nerves!
After we take the RV on its first long road trip, I will see what organization/storage is needed. And, I need some decor! I’m thinking of some cute battery-powered or rechargeable lamps like this, so I can take them outside in the evenings. I’m not a fan of the overhead lighting in the RV, but I will probably keep them and save my money. I want to hang some lightweight art or photos on the walls and customize our daughter, Ivy’s, little sleep space. If you look at the “before” photos, you can see her bed above the driver’s seat. It lifts when driving, and lowers when parked. There’s a mattress and storage cubbies built into the area and I can see her up there reading and playing when we’re parked.
I would also really like to do something with the sofa. It is faux leather/vinyl that peels as it wears, and it’ll continue to get beat up as we use it. However, there are seat belts and heat vents built into the sofa so it’s not as easy of a swap as I’d like. For now, I’ll drape a throw blanket over it and I’ll add some pillows. It’ll work for now!
To be Continued!
Do you have any questions about updating an RV? Name suggestions for ours? I took suggestions on Instagram, but that was before she had some color and personality.